First of all, since we’re doing this from one of Dunlap Woodcraft’s kits, we’re missing out on one of the most “fun” (read that as tedious) parts of building a Lancaster rifle of this period—inletting a swamped barrel from scratch.
Swamped Barrels: Pretty but a Pain in the Behind
First, let’s talk about the swamped barrel for a second. I’m certain the real experts know why our forefathers used a barrel that tapered from the breech to the muzzle and then, for no apparent reason, flared out again about a foot from the end, but I’ve never heard a reason I believe. Tapering the barrel does give much better balance than a straight barrel because it shifts the center of gravity back towards the hands. But why have it flair out again?
I personally think it’s the ancient’s way of driving future generations of gunsmiths nuts when we try to replicate guns of that period. Think about it—every flat of the octagon tapers in three dimensions. When you’re hogging out a tight fitting groove that matches a swamped barrel from scratch, it’s a LONG, not particularly enjoyable process. You can rough it with a router, but the important stuff is done by hand and it always takes me 40-60 hours. But then, I’m not a speed demon at anything.
The above is why I was delirious with joy when I dropped the wonderfully precise Getz barrel that came with the kit into the machined groove and found it fit so close. I’d only have a couple dozen thousands of an inch here and there to get it to snuggle right in. I’m a bug on wood-to-metal fit and this was definitely going to yield a “grew around the barrel” look.
Normally, you’d screw the tang out of the barrel and inlet the barrel first, then install the tang and do that last. In this case, however, the base of the tang, which usually interferes with dropping the barrel in place, already has plenty of clearance for the early portion of the fitting process. So, we can do the entire unit in one shot.
Now that I’m finished with that process, however, I think it would have actually moved faster, if I had removed the tang.
Step One: make a mess
The first thing we’re going to do is swab the bottom of the barrel and tang down with inletting black. I hate this stuff because it gets on your fingers and from there to the stock. It really doesn’t hurt anything, but it is a messy process. I use a stiff, half-inch brush to apply it.
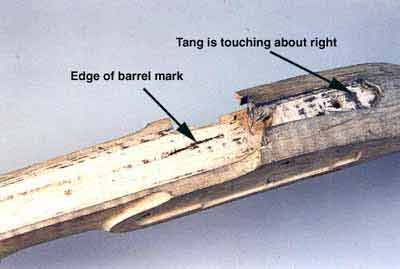
We drop the barrel into the channel being careful to make sure the back of it is against the square cut back of the barrel channel. If it slides forward even a tiny bit, all of the tapered octagonal flats move ahead and start contacting wood. When they do that, they give us erroneous readings.
The entire trick here is to gently put the barrel in place, then pull it out and see where it has left black smudges (or red, if you’re using lipstick). The conclusion is obvious—it left a smudge because it touched the wood there. So, we gently remove all of the smudges by carefully (read that again, CAREFULLY) cutting or, better yet, scraping away the high points as indicated by the smudges.
You'll really get tired of chasing smudges but they indicate where the metal is touching the wood. By "erasing" the high spots very gradually, the metal works its way into the wood. Do it slowly. Don't get in a hurry.
A quick note here: we’re only going to be moving the teeny, tiniest bit of wood. We’re right up to the finishing phases, so brace your hands so the chisel or scraper is so steady it can’t get away from you. Don’t get anxious here. Just take away enough wood that the smudge disappears. Then even out the black stuff on the bottom of the barrel (you don’t need to add more) push it down in the barrel channel and repeat the process.
You’ll only go through this particular cycle about ten thousand times on this project. As it happens, that’s about the same as if you had scratch built the stock from a board because Dunlap has gone through all the gross shaping stages and brought us up to the final phases where the inletting black comes into play. This allows us to get an exact fit without worrying about the basic alignment or shape of things. When we start to inlet the lock, however, you’ll see where the machine inletting has saved us a ton of unseen inletting chores.
Using the Transfer Method
Here are some clues about what to watch for. Keep looking for linear black marks at the bottom of the channels in the corners indicated that the edges of the barrel are making contact. Some folks will take a file to the edges of the bottom flats and round them slightly which makes getting a tight fit a lot less headache. I don’t because this seems like cheating. It ain’t quite right.
As you scrape away the high spots, you’ll notice that one disappears to be replaced by another some place else. This is part of the natural process of knocking down the high points. Think about a mountain range and you’ll keep knocking the top off the highest peaks until you finally wind up with Nebraska landscape.
Here’s a major tip for not screwing up where the wood meets the metal: from the outside all you see is the wood-to-metal seam and we can’t see what’s inside. So, stay away from the exact edge of the inlet mortise. Leave a 1/16” or so of vertical wall wood right where it touches the metal untouched until the very end of the inletting process. Then go after that with hypersensitivity and remove as little as you can get away with.
Lots of times the pressure of the barrel in the channel slightly compresses that 1/16” ledge giving you an absolutely perfect fit. The down side to doing that is that if you have it too snug, you stand the chance of peeling some grain off when you remove the barrel. Get just enough contact that it barely touches but takes no pressure to get it to fit. Don’t pound it into place.
Tang Discussions
First of all, the tang, as it comes on the barrel needs to be bent slightly to better follow the curve of the stock. It doesn’t need to be bent much, so wait until you have the barrel sitting well down in the stock so you can get a better feeling for how much bend is required. The tang is really soft, so you only have to hold the barrel in the vice blocks (padded, of course) and tap it with a hammer (with a wooden block between).
This should be self-explainatory.
The shape of the tang, with the wide tail, is very typical of the pre-revolutionary Lancaster period. The inlet in the stock is a solid 1/4” too short giving you lots of room to get it inlet exactly right. Or, in my case, to trim the tang to the “pear” shape that marked some of the better rifles of the time. The end of the tang was one of many places different builders did it “their way” and added a little personality. The pictures show the steps in trimming it. This is definitely not a must-do for you, but I thought it looked cool.
Make sure the tang is bent so it’ll lay fairly well down the curve of the stock so you can mark an accurate line around it.
Marking the Tang Inlet
I’m going to make a bigger deal out of this operation than necessary only to get a concept across that’ll come in really handy later on.
First, prepare the tang for inletting by filing a slight chamfer on the bottom corners. The vertical sides slope slightly inward, which it makes it unnecessary to get exactly square sides in the mortise. More important, by giving the tang a slightly wedge shape, you can work it down into the wood a little at a time and arrive at a 100% wood-to-metal fit every time because, as it goes down into the wood, it keeps getting wider than the hole.
Also, by making the bottom surface of the tang slightly smaller than the top, when we mark it for inletting, we’re assured of the marked area being undersized and we can work it up to match the top of the tang.
Everyone has their own way of marking pieces for inletting but I do it with a No. 11 Exacto knife. Clamp the barrel tight into the stock so the tang lays hard onto the surface. Then run the tip of the blade right up against the edge of the tang and use barely enough pressure to break the fibers on the surface of the wood. Don’t over do the pressure. Do it again with a little more pressure. Then again and a little harder. We’ll let repetition work the groove into the wood, not force.
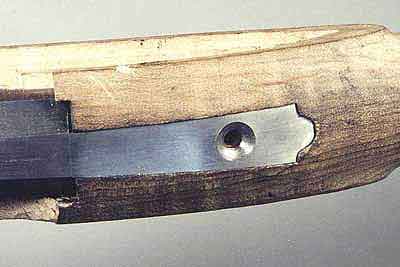
This is the way it looked before shaping.
The goal is to cut a line into the wood that clearly breaks the surface fibers so that those, which are inboard of the cut, can easily be removed. The cut won’t even be 1/16” deep, but it’ll give a jumping off point for the rest of the cutting and ABSOLUTELY DEFINES THE UPPER OUTLINE OF THE MORTISE AND MATCHES THE TANG.
The scribe line doesn’t actually match the tang, but matches the bottom surface, which is just a little small. However, because of its wedge shape, as we work it down in, it’ll be constantly touching the outer surface leaving no gap.
On using chisels.
First, all chisels are two-handed affairs. Your right hand (assuming you’re right handed) supplies the force and basic guidance, but your index finger and thumb on the other hand do the actual guiding and placement of the tip of the blade. Don’t EVER single-hand a chisel.
When starting the tang cut, take your 3/16 blade and insert it vertically into the scribe line with the bevel facing toward the middle of the mortise. This puts the straight face where the mortise has to be straight. Push down so the blade makes the scribe line deeper in that little area. Then move 2/3rds of a blade width over and repeat the process.
The goal is to increase the depth of the scribe line a little at a time all the way around. Then we come back and gingerly cut away the material between the scribe line and the mortise.
Incidentally, the Dunlap mortise is so close to the edge of the tang that you’ll only have a little area to scribe on except at the rear.
GO SO SLOWLY AT THIS POINT THAT IT DRIVES YOU NUTS. The tang is sitting right there in front of God and everybody and it’s the last place on the rifle you want to have an ugly gap staring up everyone you hand the rifle to.
I LOVE IT when a plan comes together!
A Note on Sharpness
When cutting the vertical faces of the walls, the blade should not only cut cleanly with no tearing of wood, but the surface left behind should have a slight sheen to it. If you’re working hard to shave a tiny area of the mortise, your chisel is too dull. Strop it or sharpen it.
ALWAYS ASSUME YOUR CHISEL IS TOO DULL AND STROP IT. You’ll quickly develop a feel for when it’s cutting and when you’re forcing the issue. There is no place for brute force any where in this project.
As you’re inletting the tang, you’ll be inletting the back of the barrel at the same time. So, you’ll be looking for smudges from about six inches in front of the tang to the back of the tang. This is why it’s usually easier to remove the tang and do the barrel first.
Finishing the Tang Surface
You don’t inlet the entire depth of the tang into the wood. You inlet until the top of the back of the barrel is slightly below the surface of the wood behind it, which will put probably 1/8” of metal into the wood at the very back of the tang and at least that much sticking out. Then you bring out your files and hand file the tang down to match the wood surface.
DROP THAT GRINDER!!! I said “hand” file it down. You don’t have much extra wood on the top of the wrist and the last thing you need is a nasty gouge or groove in it because you got in a hurry and grabbed a power tool.
PERFECTION ONLY HAPPENS, WHEN YOU CREEP UP ON IT. Don’t get in a hurry. This rifle will be handed down to your grand kids so use the hand file and slowly work it down to shape.
When you have it barely flush with the wood, take the barrel out and start using Wet ‘r Dri paper wrapped or glued around a hard board about six inches long. Sand in only one direction, either pulling the sanding stick toward you or pushing away. Don’t go both directions or you’ll have more trouble keeping it flat. Start out with 220-grit and work your way up to 600. In the process of sanding out all the file marks, you’ll take away just enough metal that the tang surface is slightly below the surface of the wood. This allows you to later sand the wood down for a perfect match.
Drilling for the Tang Bolt.
Center punch the position for the hole and drill the hole appropriate for the size of tang screw you’ll be using, generally about 3/16 (#10 screw). We’re going to counter sink the hole, but not until we’ve drilled the hole in the stock and we want to have the original hole all the way through the tang to help guide us.
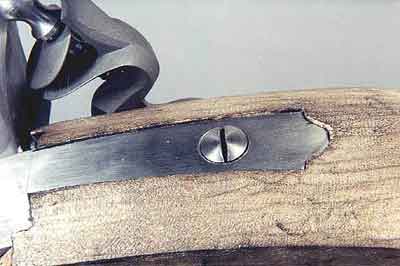
When this is sanded down, carved and finished the wood-to-metal fit will be nearly perfect. The pear-shaped tang looks cool, if nothing else. I'll replace the buggered bolt at the last minute.
We’ve got a bunch more operations to do to the barrel, like mounting the sights and the attaching lugs under it, but we’ll do those in a separate piece of journalistic chaos. Until then make haste so slowly that cold molasses is passing you.