by
Budd Davisson, exclusively for Airbum.com
Part Four: Lockin' it Up
by
Budd Davisson, exclusively for Airbum.com
Part Four: Lockin' it Up
When building a rifle from a board (not a kit) there’s always a huge amount of head scratching (and downright fear) involved in getting the lock/barrel/ramrod hole relationships right. The problem is that the lock pan has to have the proper relationship to the touch hole, which has to have the right relationship with the barrel bore and there has to be a bolt coming all the way through the stick from the off side into the lock plate.
What’s the big deal? There wouldn’t be one except that there is a 3/8” ramrod running full length under the barrel right behind the lock and THE FRONT LOCK BOLT HAS TO PASS BETWEEN THE BOTTOM OF THE BARREL AND THE TOP OF THE RAMROD HOLE. The space is generally less than 3/16”.
Show me someone who hasn’t had a lock bolt interfere with the ramrod and I’ll show you someone who hasn’t built very many long rifles from a blank. No matter how much you lay it out in full sized on the blank, sooner or later you nick a barrel or a ramrod. Or worse yet, the lock is in the wrong position on the barrel.
You don’t know the meaning of the phrase “fearful expectation” until you’ve drilled the bolt hole, put a bolt in it and then slid the ram rod in for the first time literally praying that there’s no interference.
But we don’t have to worry about all that because the kit manufacturer, Dunlap Woodcraft, has worked all that out for us. The hole is even drilled. That one factor makes using a high quality kit like this worth the price of admission.
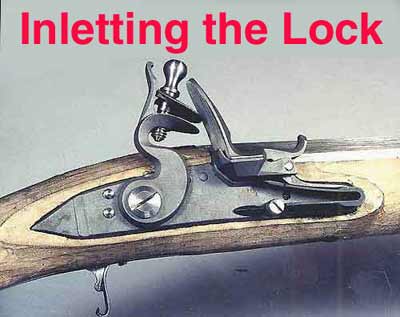
The Lock Mortise
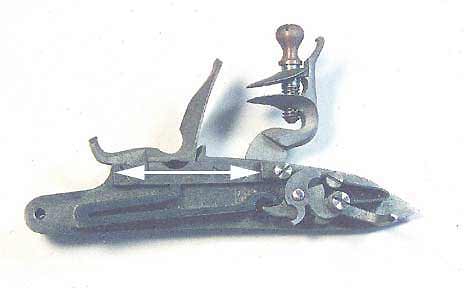
Before we start working on inletting the lock put the lock in your hand and study it. Look at the two screw heads protruding out the back (tumbler and trigger spring) and the way the main spring runs forward, tapers in width and is nearly flush with the bottom of the lock plate. It’s important you remember all the parts back there because it’ll make the inletting process make more sense to you.
 |
When starting a lock mortise from scratch on a blank, traditionally you completely disassemble the lock and do your first inletting using nothing but the lock plate. Then, once you get that set to your taste, you start putting one part at a time back on the lock and inlet each in turn. Some of us have made permanent little guides, or key templates, that give the depth of each major part so we can approximate them without having them on the lock plate.
 |
 |
If you’re not working with the Dunlap kit and have a straight barrel, there’s another little nuance here worth mentioning. Early period flintlocks, like the Haines we’re replicating here, have a lot of subtleness to their lines and if they’re wrong, the rifle doesn’t fit you as well as it should. Most folks get the wrists too fat because the originals have really skinny wrists, which means they are also weak in that area. The swamped barrel, however helps that because the lock goes in at an angle, which makes the wrist wider and stronger.
On a straight barrel, the wrist can be too skinny, so it helps to solder a little wedge-shaped piece of metal on the back of the lock bar under the flash pan that kicks the back of the lock plate out a little. The piece doesn’t have to be very thick. If it’s 1/32 (.035) at the back and tapers to nothing at the front, that’s fine.
Compared to doing the barrel and tang, finishing the lock mortise is easy. You’ll use the transfer compound and keep searching out places it touches and scraping them away. Be VERY careful at the edges of the mortise so you don’t create gaps.
Keep working until the plate fits snug against the barrel and lays 90 degrees to the plane of the barrel. Dunlap has done such a good job in this area it’s hard to screw it up unless you get in too big of a hurry.
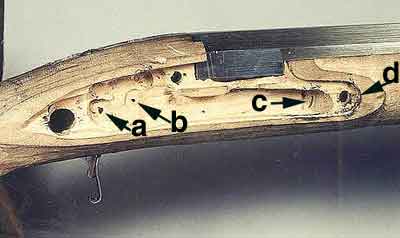
Inletting the mechanism
Put the tumbler (the round thing with notches) and the trigger spring back on the lock and put transfer stuff on the heads. Chances are you’ll find they touch the bottoms or sides of the holes already inletted in the mortise. In my case I had to remove wood on the bottom and one side of both screw head inlet areas.
Now put the main spring back in place. The spring needs room to work, so inlet it when the mechanism isn’t cocked or the bottom of it won’t have room.
The front edge of the spring is quite wide and in any inletting job drives the rest of it. Put the black crap on it and slide the lock into position. Note where the spring touches and remove just a bit of wood. This becomes the same drill: scraping, spread out the black on the spring, insert, remove, scrape, etc., etc.
Keep the process up, all the time looking for places where metal is contacting wood too strongly.
While you’re doing all of this check to make sure the trigger bar isn’t too long and contacting wood on the other side of the stock. Routinely I have to grind 1/8-3/16” off the end to get working clearances. Don’t over due the trimming. It has to extend at least 3/16” past the center of the stock to make sure the trigger blade contacts it.
By the way, while you have the lock apart, polish the bottom of the trigger bar and get it super smooth so the trigger blade doesn’t encounter any roughness. Don’t mess with the rest of the clockworks unless you really know what you’re doing. If you want to make it slicker with a crisper trigger break (we’re not using set triggers so this may be worth the effort) take it to your lock pistol smith and have him stone the parts. The reality is, however, this is mostly wasted effort because the lock works really well the way it comes out of the box. Besides, we’re not trying to drive tacks at 1000 yards with this thing.
Drilling the bolt holes
While you have the lock disassembled and the plate inletted and clamped in place, run a 3/16 drill bit on your trusty hand drill through the bolt holes from the off side so it leaves a mark for both holes on the back of the lock plate.
The bolts are #8 x 32’s so you’ll need an 8/32 tap and tap handle (if you don’t have one) and a #29 drill bit (.1360), which should be available at your local ACE hardware store for just a few dollars.
The lock plate is pretty soft metal, so this isn’t brain surgery, but make sure you make a deep center punch mark exactly where the drill bit left its mark. We don’t want the #29 drifting off center.
This is best drilled in a drill press, but a hand drill will work fine as long as you work hard at keeping it 90 degrees to the plate.
Once you have the holes drilled, carefully force the tap in by turning it a full turn or so. You just want it to catch a thread and stick in the hole so you can back off and see how perpendicular it is from all angles. Then, put a drop of oil on the tip, put some pressure on it and slowly start turning.
If you’ve never tapped anything before, the key here, like everything else is don’t be in a hurry. Once the tap is started you’re only going to turn it about 180-270 degrees before stopping, turning it backwards 90 degrees or so, and then moving ahead. This is to break loose any metal stuck to the tap and to give it more room to work. Keep it oiled.
At the beginning make it a point to check every 90 degrees of turn to see that you’re still vertical. Once you’ve cut a couple of threads, however, you’re stuck with the angle you’re going in at, so don’t rush it.
Cleaning up
You’ll notice when you try to put the hammer on the lock that it contacts wood. So, cock the hammer, mark where it hits the wood and remove that ridge. Don’t, however remove the ridge that’s standing above the lock plate all around it. We’re going to leave that until we’re doing our final shaping. This will protect the final surface until we’re ready to work with it.
Very cool! This thing is starting to look like the real thing isn’t it?
On to the butt plate.