
Budd Davisson
Flight Training, April, 2003
"A good checkout means more than kicking the tires and lighting the fires."
Budd Davisson
Flight Training, April, 2003
"A good checkout means more than kicking the tires and lighting the fires."
To a lot of folks, aviation offers no better experience than checking out in a new airplane. There’s something exciting about taking what you know about flying and stretching it to cover a new airplane’s personality and mechanics. The check-out experience itself can vary as much as the airplanes themselves because each pilot brings a different combination of skills and background to the table so each reacts to the experience differently, but always in a positive way. A newly minted PPL trading his trusty 152 for the seemingly huge 172 is going to be all grins with his nerve ends attuned to all the new sensations. To an Air Force-trained airline pilot flying a 172 as his first light airplane, the experience might be just as exciting, but for different reasons. Still, a check out should include the same bits of information and procedures regardless of a pilot’s background.
Many pilots will say, “…An airplane’s an airplane. Gimme the numbers…” so the check-out often boils down to a “Hop in, let’s do three crash and burns and you’re good to go.” In a few situations, that may actually suffice, if what we’re talking about is going from something like a Cherokee 160 to a Cherokee 180. If, however, you’re going from the Cherokee 160 to a Cessna 172, even though the power is the same, the airplanes definitely aren’t. You’ll need a little pre-flight briefing on the flight differences and you’ll need a lot of pre-flight briefing on everything from how the flaps work to how to check the fuel. There’s a lot more to checking out in a new airplane than simply flying it and don’t think stepping down from something more sophisticated to something dirt simple (an airliner to a Cub) is going to be as easy as it looks. Some of the most dangerous “gotchas” are also the simplest.
At the risk of getting too anal about this thing, let’s try to develop a specific, one-size-fits-all procedure that can be applied to any airplane at any time. In some cases, there will be things here that don’t apply, like worrying about flaps during a Cub check-out, or there maybe items peculiar to a given type that don’t apply to any of the others, like inverted spins on a Pitts check-out. In general however, we’ll try to walk down the middle of the envelope and come up with something that will apply to just about every airplane you’re likely to fly. If, however, the airplane is so unusual that it is far off in the fringes of the bell-shaped curve (a Fiesler-Storch or a Harrier) you’re going to get more than a kick-the-tires-light-the-fires check out anyway.
 |
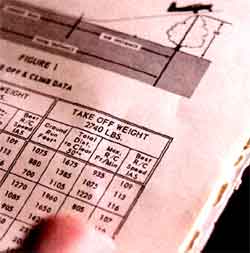 Pay particular attention to how the different systems operate. How many notches of flaps are there and what are the speed limitations for each? If it’s a retractable, study the emergency extension system so you’ll now more about it when you get in the airplane. Same thing for the electrical system: get to know the breaker system. A few POH’s give a schematic of not only the fuel system but the electric system as well. This is good information to have should something stop working in the air.
 Feel it Out
There are a number of simple maneuvers with an airplane that will tell you a lot about it in a few minutes. They are:
Coordinated rolls on a point. Do a few of the so-called (erroneously named) Dutch roll coordination exercises where you keep the nose on a point on the horizon while quickly rocking the wings back and forth from a 30° bank one way to the other way. It’ll show you how to use the rudder to keep the ball in the center.
360° turns. Crank it around in 45° banked turns left and right and see how much speed burns off and how high you have to keep the nose as well as how much power is required to hold altitude. You should stay within 50 feet of your altitude while doing this.
Slow flight. At stall speed plus no more than seven to ten knots, make turns right and left, then climb and descend to get a feeling for how speed-stable it is and how much you have to lead both altitude and speed changes.
Stalls. Get plenty of altitude and do the entire series and don’t recover the second it burbles. Let it actually stall, while paying particular attention to how it reacts before it stalls. Hold it in the stall for a couple of seconds then gradually release the backpressure without adding power. See if it starts flying, then add power to see the effect power has on the recovery. Do that once or twice, then use normal procedures for the rest of the series: release pressure as soon as it breaks (or mushes with the elevator full aft) and go to full power. The stalls should include:
-Power-off, with and without flaps
-Power-off in turns, with and without flaps
-Power-off accelerated in turns, with and without flaps
-Power-on in turns, no flaps.
Slips. The POH should tell you whether there are restrictions against slipping with the flaps down. Generally, if there is a restriction, it will only be at full flaps. Regardless, when you’re finished with the stall series and still slow, set up a glide and try slipping it right and left with varying amounts of flaps out. Pay attention to both the nose attitude and the airspeed during the slip. See if it has a tendency to pitch up or down and whether you have to work to keep it from going either slow or fast. Different airplanes react different ways and some show contradictory behavior in a slip depending on whether the flaps are up or down.
While cruising around, use the power settings you found in the POH and see how close the power settings come to producing the airspeed predicted by the POH. In general, POH’s are optimistic. Also, before you took off you made sure the tanks were completely full. You’ll refuel as soon as landing and this will give you a real-world fuel burn number to be used as a back up to the fuel gauges.
Landings
Don’t be satisfied with making three landings that were all “pretty good.” Do landings with and without flaps. Make one or two with slips. Try a couple of short field approaches and, if you don’t have a cross wind, go find one. In fact, it’s a pretty good idea to land at a couple of unfamiliar airports anyway just to get used to landing a strange airplane on a strange runway.
On all the landings, pick a spot on the runway in the first 500 feet or so and try to hit that spot every time. Don’t be satisfied with good landings that aren’t where they should be on the runway. Part of learning a new airplane is become accustomed to how it glides, or doesn’t glide, and unless you’re trying to hit a given point, you only have a rough idea of its gliding behavior.
At least part of your landings should be completely power-off. This is not only to establish it’s gliding behavior, but also to help you develop a set of references as to where the airplane will wind up power off. This way, if you loose an engine, you won’t be bumbling around while guessing where the airplane will land. A few power-off landings tell you much more about the airplane than a dozen power-on landings will.
During the landings get a feel for how quickly the airplane looses speed as you start the nose up in the flair. Notice the difference in speed-burn between no flaps, partial flaps and full flaps. In some airplanes, the change is drastic and hard to miss.
Emphasize crosswind landings during your check out. This is critical. Some airplanes give the impression that the wind will beat you to death, when in truth the airplane can do it fine if you’ll just be firm with the controls. Others give you plenty of control in the air, but when you’re de-accelerating in ground effect, you’re hard pressed to kill even the most normal crosswind. Don’t wait until you’re solo for the first time to find out how it handles in a crosswind. Try to do it during the check out while there is someone to ride herd on you.
Flying new airplanes is pure fun, but it’s serious fun, where the goal is to become intimately familiar with the airplane, not just vaguely acquainted. You want to know its bad points and its good points in as many situations as possible and if this takes a couple of flights to accomplish, so be it. There’s nothing worse than being in a new airplane and having something happen that causes the thought, “I sure wish the check pilot had told me about that,” to flash across your mind. Time and money spent on a solid check out is a worthwhile investment in your future.