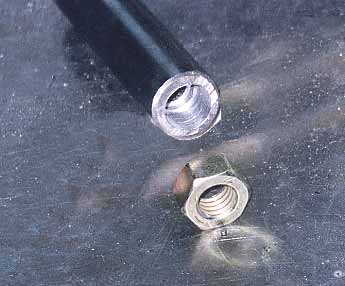
First I took 3/4" pieces of steel tubing (pipe would work) and bored 1/2" holes in the end to let the bolt pass through the nut, which I was going to weld to the end of the tube. The tubes were slightly longer than the rails were deep - 4" plus.
Of Blind Bolts and Radius Rod Mounts
Lookin’ for Another Way
Mounting the ends of radius rods, especially split wishbones, simply shouldn’t be that difficult, right? After all, about a bazillion open-wheel cars have been built and the radius rod mounts have been pretty much the same: you cut the eye (the piece with that uniquely-Ford tapered hole) off a steering arm or two, weld it to a piece of steel plate and bolt that plate to the side rail of your car and you’re done. End of conversation.
So, why is everything I do so damn difficult and different?
When it came time to mount my radius rods I discovered three things that I knew were going to give me more than my share of heartburn.
I considered shortening the radius rods, but I felt as if they were short enough already. Besides, conventional wisdom today says you aren’t supposed to use radius rods on a tube axle because the tube won’t twist like an I-beam axle will on bumps and something is bound to break. You’re supposed to use four-bars. Shortening the radius rods would amplify the problems.
Of course, during the ‘50’s we weren’t smart enough to know all of the above, but I don’t remember anything breaking. In fact, if you look at the Bill Niekamp, World’s Most Beautiful Roadster (a kick-ass, track nosed ’29 roadster) you’ll see radius rods on a tube axle. If you look at almost all midgets and sprints of the period, you’ll see radius rods on tube axles. So I’m not worried about my set up. If I can ever get it to work, that is.
My first thought about mounting the radius rod perches was to run six inch bolts vertically through the 4” tubing rails, but that wouldn’t work on the left side because of the steering box and its bolts. Besides, those are awfully long bolts and would eventually work loose.
My second throught was to cut holes on the inside of the frame rail that would let me put nuts inside the frame rails for the bolts. But that wouldn’t work on the left side. Besides, it went against the grain to cut weakening holes just to gain access to a couple of nuts.
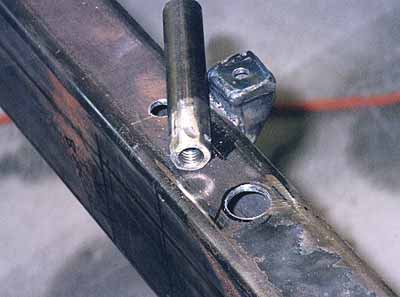
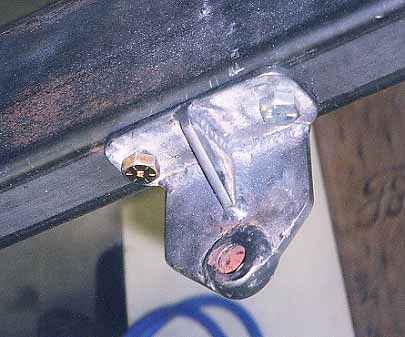
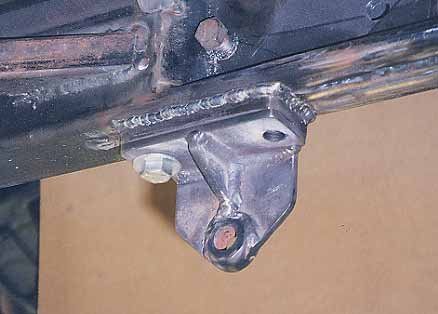
The solution popped up while I was mounting the steering box. One of its bolts had no room for a nut on the outside because of body interference. So I came up with the how-to-put-a-nut-inside-a-frame-without-cutting-a-big-whopping-hole system. If you look at the pictures you’ll see how it works.
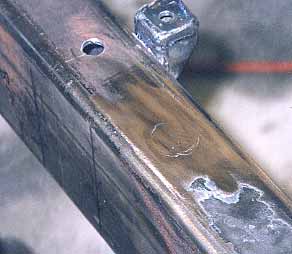
For the radius rod mounts, themselves, I welded up “L” shaped brackets out of 3/16” 4130 (just because I had it). I carefully measured (and re-measured) the wheelbase on both sides of the car, measured a bunch of diagonals and marked the frame rails for the proper locations of the brackets. I drilled 1/4” holes in the base of the right bracket, then lightly tack welded it in place on the rail. I didn't want it to move. Then I match drilled 7/16” holes through the bracket and the frame rail at the same time. That way I knew the holes exactly matched.
Then I drilled 7/16” holes in the top of the rail in a matching position.
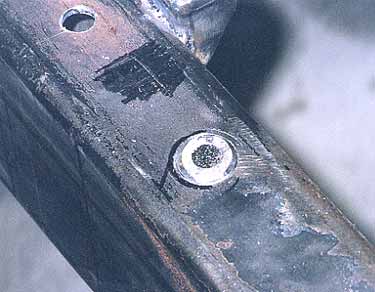
The goal of the next operation was to put Grade 8 nuts on the inside of the bottom of the frame rail in such a way that they’d always be there and I wouldn’t have to worry about them moving.
Take a look at the pix. Personally, I think the concept works slicker ‘n a squashed gopher, as we used to say back in Nebraska.
|
 |
 |
 |
 |
 |
As is always the case, I spent more time worrying and thinking about the project then actually doing it.
I think this works really well.