Framed! I Didn’t Do it (…right the first time)
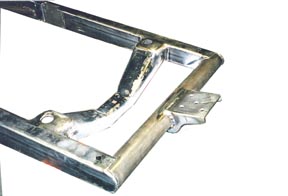
The final result of the rebuild: the rear spring mount and motor mount crossmembers are original
Framed! I Didn’t Do it (…right the first time)
The final result of the rebuild: the rear spring mount and motor mount crossmembers are original
 |
I should probably mention that I still think Niekamp’s roadster was/is the most beautiful street roadster ever built. So, don’t be too surprised if somewhere down the road this little car winds up with a track nose as a Niekamp sorta-clone.
I don’t remember what a dropped axle cost in those days, probably about $20 used, which I could have scrounged up somehow, but I was determined to use that round axle. This decision set in motion a series of compromises that have haunted me to this day. I don’t regret the decision because it is so much a part of the character of the car, but it complicated the living hell out of everything I did on the front of the frame, the radiator size/placement, spring suspension, grill shell attachment, and on and on.
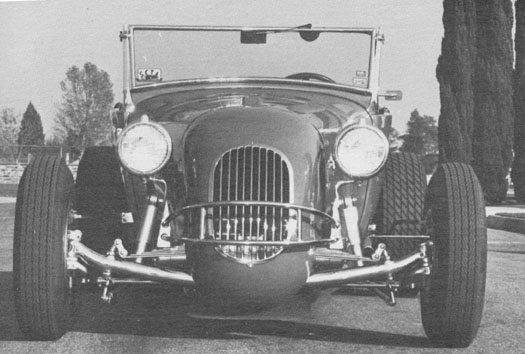
You’d see a few T-bucket drag cars in those days running “suicide” suspension where the front crossmember had what are now a common kind of spring perch sticking out front. Niekamp went the concept one better and ran the spring over the top of the spring perch, thereby gaining another 2 1/2” drop because the car hung from the bottom of the spring and didn’t sit on the top. So I did that.
But, the frame still didn’t sit low enough for me. Forget that we had railroad tracks all over town and the driveway up to my house had a big dip in it, I wanted this thing L-O-W. At the time I didn’t realize that I was getting the customs and the roadsters confused in my mind and that most of the roadsters sat high enough to navigate anything and the serious customs couldn’t crawl over a caterpillar.
So, I cut the front of the frame and Z’d it, stepping it up and gaining another 4” of drop. Now it was LOW!
All of this took place AFTER, I had the body sitting down over the frame AND the engine mounts welded in place. It was only after I dropped the engine back in after cutting and Zing the frame that I realized I could bounce the oil pan off the garage floor by jumping up and down on the front of the frame. Oh-oh! At least it was low.
The engine had to come up, if the car was going to go down. This was complicated (every damn thing I do seems to get complicated) by the fact that because of my teenaged, get-it-to-look-like-a-hotrod-for-when-my-friends-come-visit frenzy, I did a quicky version of channeling: I simply torched the floorboards out, dropped the body down and WELDED it to the frame. Actually, I didn’t weld it, because I couldn’t weld worth a crap, so I brazed it in place, with lots of pieces of steel strap here and there in an effort to reinforce it.
I should mention that half the fun of having a car that looked (in my mind anyway) like a California hotrod in a small town in Nebraska was the notoriety it gave you. I loved it when guys would stop by to see what I was building. Even older guys, some of them who, were actually seniors in high school, came by. Boy that made me feel important. For that reason, there was a fair amount of teenage showmanship involved here: it had to look like a hotrod when guests arrived, so it couldn’t be sitting around the shop in pieces for any length of time. It always had to look like a car so the body had to be put on the frame immediately. Never mind that welding the body on the frame at that stage made life very, very difficult when I had to do anything else that involved the frame.
Obviously, my tendency to do everything the hard way, a trait that is central to my character to this day, began in childhood. For all I know I was a breach birth because doing things ass backward came naturally. I probably had my little ear against the womb wall and heard doctors saying that a breach delivery was the hard way to come into the world. So, I opted to go butt-first and I’ve been doing it since.
To make a long story short (too late, right?), I wound up with part of the back of a Willys frame of some kind brazed/welded/bolted to the back of the frame to kick it up. The front spring perch was hacked out of 1/4” plate with a torch and the spring holes burned in it. To mount the Ross steering box (that was the hot set-up according to the little Rod & Customs), I torched a big chunk out of the left frame rail flange and did my version of welding a plate into mount it and, again, burned the mount holes in it. Yessir, this kid is born to be a craftsman.
Then, to let the engine move up, a big chunk was torched out of the stock Model A center cross member to let the torque tube pass through and some angle iron and channel iron cobble-welded in place to mount the ‘39. It was UGLY!!
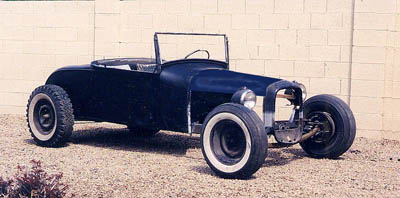
So, now we flash ahead 42 years and I have this thing sitting on my shop floor in Arizona determined to save it. When Lowell Krueger did some of the bodywork I also had him un-Z the front of the frame and fabricate a new Z for the back, but the rest was as it had been in 1957/58. Only it had gotten uglier with the years. But I was determined. And I was incredibly stupid.
In the interest of brevity let’s just say that six months, an entire roll of MIG wire and lots of steel plate later, what I had was this twisted, out of square frame that was much stronger but still incredibly ugly. The stuff I found I’d done in the old days was flat scary: the steering box mount plate, for instance, was barely tacked in place.
Old age gives you incredible patience. In this case, however, the patience finally ran out. I looked at that frame with the left rail twisted where the steering box cut out interrupted the flange, the mess that I’d created as a youngster in the trans mount/crossmember area and the mess I’d created as an oldster while trying to clean it up. I looked at the super-questionable front spring perch. I looked into the future at all the times I would have to explain that “…no, it’s such an ugly frame because it’s original. I can do much better today.”
More than anything else, I found myself thinking about all the people at car meets who would walk away shaking their heads and thinking that’s what kind of craftsman I am rather than what kind of craftsman I was as a teenager. That thought started as an irritating tickle in the back of my brain. Then it expanded to become one screaming, I-can’t-handle-this, incredibly caustic mental burning sensation.
One day, as I was sitting on a stool staring at this monstrosity, I calmly got up, lit up a cutting torch and proceeded to cut the rear section off the frame and excise the ’37 motor mount member from the front. In 15 minutes all of that work and all of the history was a pile of scrap behind my shop, the cut ends still smouldering. I had finally found the only proper use of a cutting torch in hotrodding.
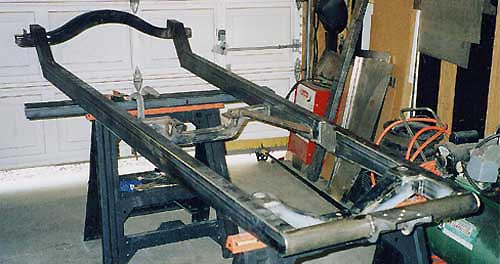
Enter the New Frame
I still had the rear cross member with the 2 x 4” tubing kick-up members that Lowell had welded to them. And I had the ’37 motor mount member. And I had the body. Much more important, I had some side view pictures I had shot of the car sitting on its original frame, which Lowell had extended to allow me to drop a tall radiator behind the tie rod. I’d never liked the long look the extension gave the car, which is why I planned on shortening the frame from the beginning.
I scanned the pix into the computer, used the cement block wall behind the car as a dimensional reference, did some computer magic to shorten the car until it looked right and that’s where the wheel base came from. It was strictly done by looks.

The hood in the picture was drawn in the computer to complete the lines. Also note: the tires are the same that the car sat on in the shed for 42 years and, when we put an air hose to them, they held air. Even more amazing, the back ones are tubeless. They were the snow tires off my folk's Pontiac station wagon.
Before cutting the frame up, I had hung a fan on the engine, added 3/4” for clearance and 4” for a radiator, and marked the frame, so I already knew how much it could be shortened and still get everything in place. The computer magic, however said I couldn’t shorten it that much or it would look stubby. So, I wound up with plenty of fore and aft room to run a fan.
To shorten the frame-building extravaganza to something less than novel length, I’d do it in outline form.
1. I bought 20 feet of 2 x 4” tubing plus a 2 1/2 piece of 3/16 wall1026 steel tubing for the front cross member and a couple feet of 2” square 1/8 wall tubing for the trans mount member. I then got a bunch of 3/16” chrome-moly plate for spring mounts, etc.
2. Using the rear section of the frame and the firewall dimension, I snapped chalk-lines on the floor to give me the proper taper lines and rail lengths.
3. Cut frame rails to length and using a 4” Makita angle grinder, cut a 30” long pie-shaped piece out of the front of the frame rail to taper the bottom line upwards to meet the round cross tube member. When welding the taper closed, it pulled the rail a full 3/4” down at the front, but using a rose bud tip in the torch, I heated the top of the frame member in bands and shrank it back up. It was amazing how much shrinking the weld did when cooling! When finished the rail had a very Ford-like taper to it.
4. Tack welded the new frame rails to the original stubs coming off the rear cross member.
5. Jigged everything in place by laying 2x4 tubing under the frame, squaring the rails to the chalk lines, putting punch marks in all four corners to use in measuring the diagonals, got them all even, then heavily tack-welded the frame rails to the 2 x 4 cross pieces underneath to hold them in position. From this point on, I constantly checked the diagonals and had a four-foot level across the rails at different stations.
A note here: because I’d done a lot of jig building to make airplane parts, I used the same precautions and technique on jigging this frame. When welding the frame, I’d weld a couple inches on one rail, then go to the other side and weld a couple inches in the opposite place on the other side. I kept the welds even right and left and rotated the frame while welding to keep the welding distortion from pulling it out of square. When I was all finished, the diagonals were within 1/16”, which I found pretty damn amazing.
6. I made up the center crossmember by cutting dados in the sides of the 2” tubing, bandsawing 3/16 plate to the outline you see and, chamfering the edges of everything heavily to give a place for the weld beads to lay. Then I laid the plate into the dadoes in tubing, welded it and ground everything smooth. I think it came out looking good, although it was much more work than necessary.
7. Mounted it in the frame by cutting holes in the frame that exactly matched the tubing, I slid it into place, got it exactly square and centered and welded it.
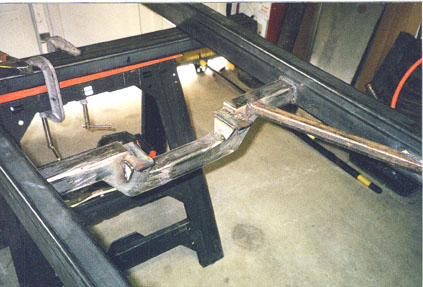 |
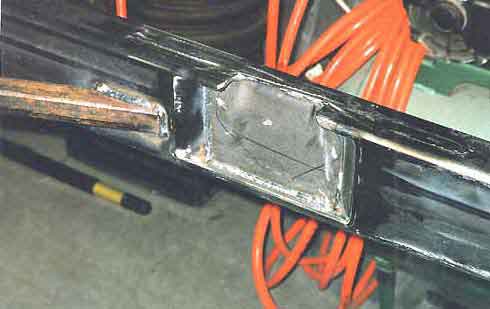
8. Before cutting the piece out of the left rail for the steering box, I cut a 1/4” slot in the top and bottom of the rail in the right place to mount the box that extended six inches in both directions past where the box would go. I chamfered the edges of the slot, then dropped a piece of 1/4” chrome-moly plate down through it. The edges of the plate were champered too. I cut the plate flush with the top, but it extends 3/16 out of the bottom to give the weld plenty of bite area. I welded this plate in place (an inch at a time to prevent distortion), ground it smooth on the top and dressed it neatly on the bottom. To make sure the frame rail would stay straight, I welded a heavy wall piece of 1” tubing back at an angle to the trans crossmember that also gave me a place to mount the hydraulic clutch cylinder.
 |
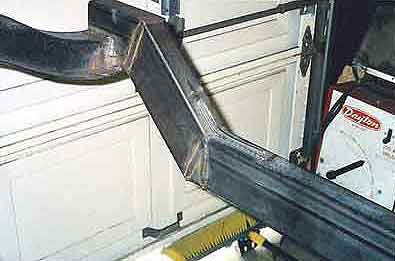
9. I did the same kind of internal plate reinforcement at the bottom of the “Z” at the rear of the frame. What look like puny little gussets are actually the edges of 3/16 plate going all the way through the frame rail. This is an aircraft way of stiffening tubing structures.
 |
 |